The simple answer is no; HMRC mandate a digital chain end-to-end.
However, you are allowed to manage your VAT using your own software or spreadsheet (such as Microsoft Excel, Apple Mac Numbers, LibreOffice or OpenOffice for example). You then export the VAT return data to a file and use our MTD VAT filing software to upload that file and submit to HMRC. You are not allowed to edit the exported file or create it manually.
Your accounting or spreadsheet software will most likely export VAT return data in various formats. We require data in a CSV or plain text file. See our FAQ How do I create a file to upload? for further information.
For further details of digital record keeping we recommend you
have a look at:
"Section 4: Digital record keeping" of
VAT Notice 700/22: Making Tax Digital for VAT
Note that you should always refer to the latest notices from HMRC.
Your file should be a plain text file or in CSV format.
CSV stands for Comma Separated Variables, and is essentially a plain text file in which data is separated by commas.
If you manage your VAT data using spreadsheet software (for example, Microsoft Excel, Apple Mac Numbers, LibreOffice or OpenOffice),
you will be able to export the data to a plain text file or CSV format.
Professional accounting software packages should also allow you to export data to CSV.
We recommend you have a separate tab which contains the VAT return data.
WARNING: Beware with negative entries in your file, particularly BOX4. This box is used to claim back tax and is normally declared as a positive number, except in rare circumstances (negative entries are permitted on a VAT return but are not normally required). In any case, you MUST check BOX3 and BOX5 after upload. We compute these and override your values as HMRC have strict rules for them.
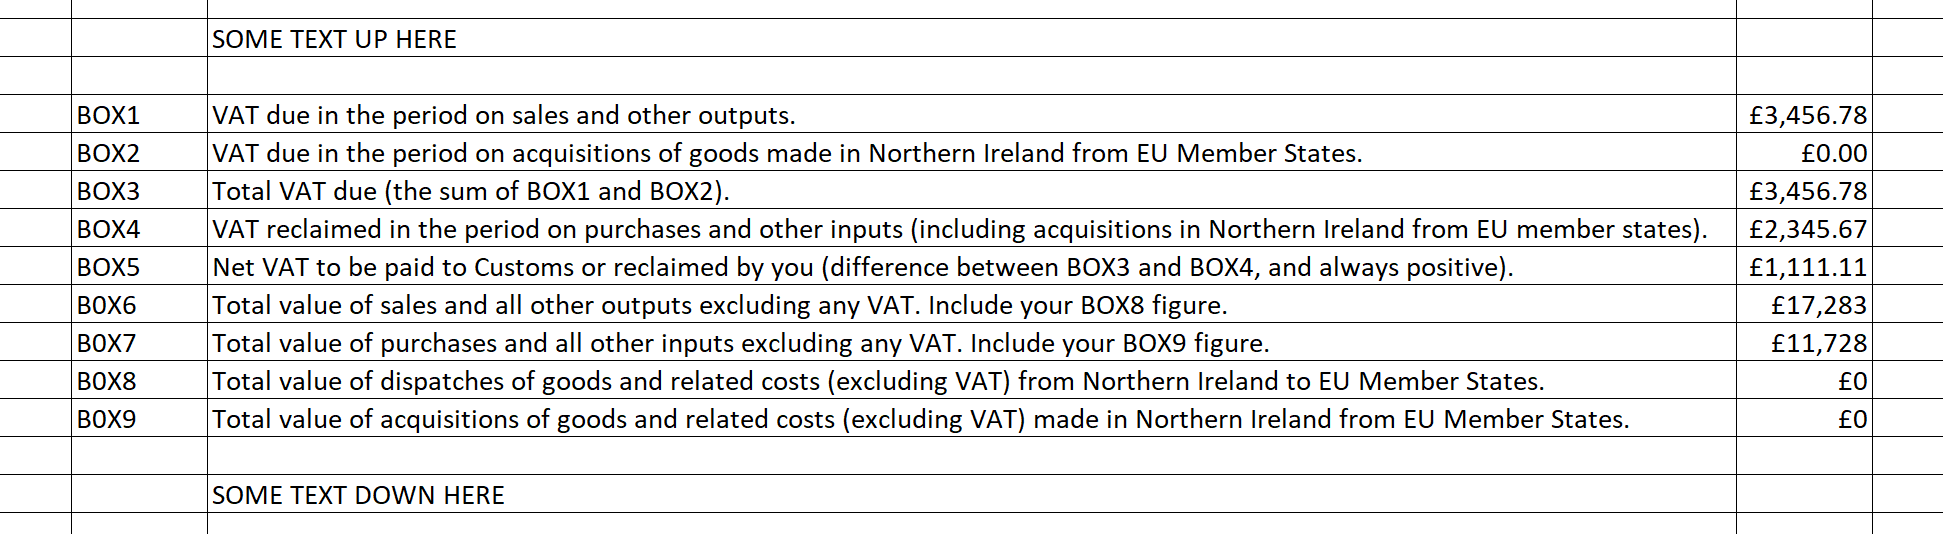
We accept various data layouts as shown below.Example 1:
Your spreadsheet tab can have three columns of data as shown below, with optional lines of text above and below the data. This is the most popular format.
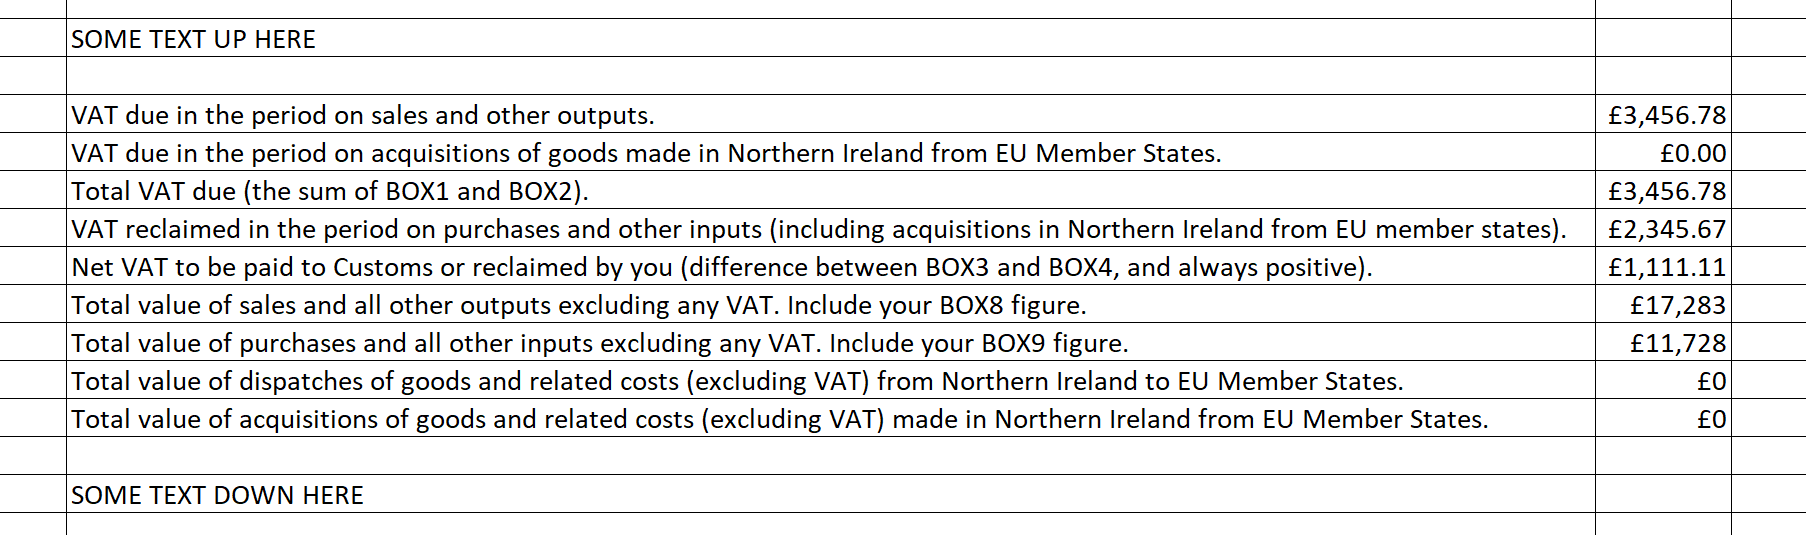
Example 2:
Or you could have two columns:
Example 3:
Or, to keep it really simple, you could have just the data, and nothing else. In this layout, the VAT number may be present as the first entry. So we expect either nine entries in the file (no VAT number), or ten entries (when the VAT number is present as the first entry). There should be no other data in the file.
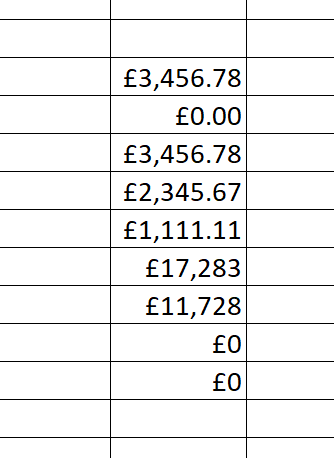
The nine entries are identified in order as follows:
- Box1 is the 'vatDueSales' figure (must be pounds and pence)
- Box2 is the 'vatDueAcquisitions' figure (must be pounds and pence)
- Box3 is the 'totalVatDue' figure (sum of Box1 and Box2)
- Box4 is the 'vatReclaimedCurrPeriod' figure (must be pounds and pence)
- Box5 is the 'netVatDue' figure (the difference between Box3 and Box4)
- Box6 is the 'totalValueSalesExVAT' figure (must be whole pounds only)
- Box7 is the 'totalValuePurchasesExVAT' figure (must be whole pounds only)
- Box8 is the 'totalValueGoodsSuppliedExVAT' figure (must be whole pounds only)
- Box9 is the 'totalAcquisitionsExVAT' figure (must be whole pounds only)
You can
check here ➤
to see if your file is compatible with our services.
Some other points to note:
- Box3 and Box5 are computed, but the entry must still be present.
- Spurious spaces and tabs (white characters) and blank lines are ignored, so don't worry too much about alignment or presentation.
- Numbers must be decimals (two decimal places only) or integers. Numbers in scientific notation will be rejected.
If you manage your data in a spreadsheet, follow the instructions below to create a file you can upload
with our software to submit your VAT return.
You can perform the following steps in Microsoft Excel, LibreOffice and OpenOffice. See separate FAQ for Apple Mac Numbers.
Step 1: Create a separate tab using your software/spreadsheet for your VAT return data. The VAT data should be created using links to data on other pages of your spreadsheet, for example 'Sales' and 'Purchases' tabs (in other words they are computed, or updated, automatically as you enter your sales and purchase figures in other parts of your file). It is crucial that you do not create this page by manually entering these numbers (HMRC won't like it!). We support various data layouts (see separate FAQ 'What data layouts do you accept?'). For example, to keep it simple, you could just have the nine VAT numbers, in order, required for your return.
Step 2: When you are ready to submit your VAT return, save the page to a CSV or plain text file. You can do this in most spreadsheet software (e.g. Excel, OpenOffice, LibreOffice) by using the 'Save As' button and selecting the 'Save as type' option and choosing 'CSV (Comma delimited)(*.csv)' option. Only the current tab will be saved (which is what you want).
Once you have this file you can upload it using our software and submit your VAT return. We recommend you retain the uploaded file as part of your audit trail.
If you use Apple Mac Numbers, follow the steps described below to create a CSV file. This is the file you upload on our website to submit your VAT return.
Step 1: Create a separate tab in your Numbers spreadsheet file for your VAT return data. The VAT data should be created using links to data on other pages of the spreadsheet, for example 'Sales' and 'Purchases' tabs (in other words they are computed, or updated, automatically as you enter your sales and purchase figures in other parts of your file). It is crucial that you do not create this page by manually entering these numbers (HMRC won't like it!). We support various data layouts (see separate FAQ 'What data layouts do you accept?'). For example, to keep it simple, you could just have the nine VAT numbers, in order, required for your return.
Step 2: When you are ready to submit your VAT return, save the page to a CSV or plain text file as follows:Step 3: In Numbers, Select File.
Step 4: Click Export To > CSV...
Step 5: Click Advanced Options.
Step 6: Select UTF-8 as the choice for Text Encoding.
Step 7: Click Next.
Step 8: Select the save location for the file.
Step 9: Click Export.
We don't process spreadsheets directly.
Please see our FAQ How do I create a file to upload? for details on how to create an upload file.
Yes. Whatever spreadsheet software you have, you should be able to create a CSV or plain text file containing your nine VAT return figures (which is all we need in the file). This is the file you upload on our website to submit your VAT return.
All popular spreadsheet software (Microsoft Excel, Apple Mac Numbers, LibreOffice or OpenOffice) allow you to create a CSV file.
Please see our FAQ How do I create a file to upload? for details on how to create an upload file.
The first step in the sign in process requires you to supply an email address and password.
This is in common with many sign in methods.
To enhance account security a second step is implemented.
The two-step process is referred to as two-factor authentication (2FA).
The second step can be implemented in different ways (for example, SMS text).
We use the Time-based One-Time Password (TOTP),
which is generated locally by an app (the authenticator app) running on your phone or tablet.
To sign into your account requires you to enter your email and password (the first step) and
then the one-time password from the authenticator app (the second step).
If cyber criminals somehow manage to acquire your username/password credentials, they will
not be able to access your account without this additional security step.
2FA significantly enhances the security on your account.
The second step in 2FA requires you to install an authenticator app on your phone or tablet.
The good news is that any authenticator app you choose should work, but you should obviously
only install one from a trusted source. We have tested the following (in no particular order):
Microsoft Authenticator App
Twilio Authy 2-Factor Authenticator App
2FAS Authenticator App
FreeOTP Authenticator App
Google Authenticator App
Other authenticator apps exist. The apps are easy to use and, at the time of checking,
all of the above are free and none require an account. It is recommended that you
use an app that has an access lock, such as a PIN.
Also, you may wish to choose an authenticator that works across multiple platforms.
If you're already using an authenticator app, that's great, otherwise you will need to
install one before you can start using our MTD for VAT bridging software.
Some password managers have integrated 2FA authenticators built-in, if so, you do
not need to install a separate app.
You can find out more about 2FA by searching online. Search also for TOTP (Time-based One-time Password).
During registration you will be asked to setup two-factor authentication. This is usually done by scanning a QR code with a two-factor authentication app installed on your smartphone or other device. This is by far the easiest way of setting up 2FA, but you can do it manually. We present both the QR code (for you to scan) and the key itself in plain text so that you can configure authentication manually if desired. We recommend the 'WinAuth' authenticator if using a PC.
If you do not have (or don't want to use) a smartphone, you can setup authentication on Microsoft Windows PC as follows:
Step 1: On your PC, install the WinAuth executable (download from https://winauth.github.io/winauth/download.html ). WinAuth is a Microsoft Windows alternative to using a smartphone 2FA application.
Step 2: Before proceeding any further, start the registration process on SafeAccounts.
Step 3: Continue SafeAccounts registration by clicking on the registration link sent via email.
Step 4: Choose and set your SafeAccounts password and click on continue. On the next page, in addition to the QR code (which we're going to ignore), a secret two-factor authentication key unique to you is presented at the bottom of the page. Copy this key. WARNING: copy this key exactly as is - do not include additional spaces or other characters at the beginning or end. Leave the SafeAccounts page open (we'll come back to it shortly).
Step 5: Open up WinAuth (set password if necessary).
Step 6: On WinAuth, Click on 'Add'.
Step 7: From the list that appears, select 'Authenticator'.
Step 8: In the form that appears, set 'Name' to identify the entry. We recommend 'MTD_for_VAT@SafeAccounts'. DO NOT use your account email (bad for security).
Step 9: Under Item 1, copy and paste the secret key we present to you during registration from the SafeAccounts page.
Step 10: Under Item 2, select the following settings:
| Type | Time-based |
| Hash (Algorithm) | SHA1 |
| Interval | 30 seconds |
| Digits | 6 |
Step 11: Under Item 3, click on 'Verify Authenticator'. At this point 6-digit passcodes will begin to be generated.
Step 12: Enter the passcode currently being displayed into the SafeAccounts registration window. This step is necessary to confirm that you have setup the authenticator correctly.
Step 13: If SafeAccounts accepts the passcode, then registration is successful. If SafeAccounts did not accept the 6-digit passcode, check you have copied the authentication key correctly from the SafeAccounts page. You must use the key showing at the time of registration, and not any key from a previous registration attempt.
Step 14: IMPORTANT Close the WinAuth form by clicking on 'OK' (this saves the entry in the authenticator). WinAuth has been successfully set up for SafeAccounts authenication.
During registration you will be asked to setup two-factor authentication. This is usually done by scanning a QR code with a two-factor authentication app installed on your smartphone or other device. This is by far the easiest way of setting up 2FA, but you can do it manually. We present both the QR code (for you to scan) and the key itself in plain text so that you can configure authentication manually if desired. We recommend the 'Authy' authenticator if using an Apple device.
If you do not have (or don't want to use) a smartphone, you can setup authentication on Apple Mac as follows:
Step 1: On your computer, install Twilio's 'Authy' authenticator (download from https://authy.com/download/ ). Twilio Authy is an authenticator that can be installed on Apple devices, including Apple Macs.
Step 2: Before proceeding any further, start the registration process on SafeAccounts.
Step 3: Continue SafeAccounts registration by clicking on the registration link sent via email.
Step 4: Choose and set your SafeAccounts password and click on continue. On the next page, in addition to the QR code (which we're going to ignore), a secret two-factor authentication key unique to you is presented at the bottom of the page. Copy this key. WARNING: copy this key exactly as is - do not include additional spaces or other characters at the beginning or end. Leave the SafeAccounts page open (we'll come back to it shortly).
Step 5: On your computer, startup Authy.
Step 6: Click on the '+' button to add an account.
Step 7: Select 'Enter key manually'.
Step 8: Copy and paste the secret key we present to you during registration from the SafeAccounts page into Authy. Click 'Save'.
Step 9: When asked to choose a logo, select any, for example 'Generic' (you may have to select 'cancel' first).
Step 10: When asked to edit the logo and select a nickname, we recommend 'MTD_for_VAT@SafeAccounts'. DO NOT use your account email (bad for security). Click on 'Save'.
Step 11: Authy will now start generating 6-digit passcodes.
Step 12: Enter the passcode currently being displayed into the SafeAccounts registration window. This step is necessary to confirm that you have setup the authenticator correctly.
Step 13: If SafeAccounts accepts the passcode, then registration is successful. If SafeAccounts did not accept the 6-digit passcode, check you have copied the authentication key correctly from the SafeAccounts page. You must use the key showing at the time of registration, and not any key from a previous registration attempt.
This is the last piece of the jigsaw required for MTD for VAT.
Many accounting software packages can export VAT return data to a file,
you then use bridging software such as ours to submit that data to HMRC.
Some accounting software incorporate this last step, so you can manage VAT
returns entirely from within the accounting package.
You can use our services if your accounting package does not submit
MTD VAT returns directly to HMRC.
For example, you may use a spreadsheet to manage your VAT data.
In this case you can export the VAT return data from the spreadsheet to a plain text
or CSV file and use that to upload and submit your VAT return.
This is described in detail in "Section 4: Digital record keeping" of
VAT Notice 700/22: Making Tax Digital for VAT
Note that you should always refer to the latest notices from HMRC.